Record music from the internet – free -- to your computer and burn it to CD
This explains how to record music from the internet onto your computer, and then (if you want to) burn it to a regular CD to play in any CD player.
This is not the same as downloading music. When you "download music", you download a file (generally in MP3 format) that you play on your computer, or maybe burn to CD. Sometimes, this is risky, since there are laws against file sharing on the internet.
However, there are no laws against hitting the "record" button on your computer’s Sound Recorder (more on this in a moment). You will have the same music as you would if you had "downloaded" it whether legally or illegally. No one knows or cares if you hit the record button on your VCR, or your DVD RAM box to record your favorite TV or cable shows. This is basically the same process we will be doing with music.
If you are using Windows Vista, you will need the Windows XP Sound Recorder, since the Sound Recorder on Windows Vista will not do everthing that the one on Windows XP will do. Here's how to get the Windows XP version:
Go to a Windows XP computer and browse to the c:\windows\system32 folder, and locate these two files:
C:\windows\system32\sndrec32.exe
C:\windows\system32\mmsys.cpl
Copy the above files to a flash drive, and copy them to your Windows Vista computer to the c:\windows\system32 directory. Create a short-cut to the file "sndrec32.exe" and drag it to your Desktop. Click on this short-cut to open the Windows XP Sound Recorder. It should work from there.
Pull up Sound Recorder. To do so, click Start, click Programs (or All Programs), then click Accessories. Click Entertainment, and finally click on Sound Recorder. It should look like this:
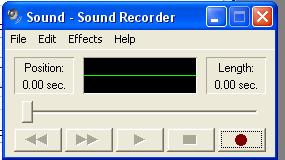
Once you have Sound Recorder running, do the following:
Click Edit, then click Audio Properties.

In the middle rectangle labeled Sound Recording, click Volume, as shown below.

Click Options, click Properties.
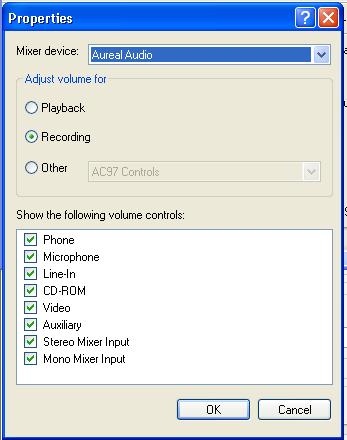
Then make sure the "Stereo Mix" or "Wave Out Mix" button is checked. It's ok to check all of these here, but make sure the "Stereo Mix" or "Wave Out Mix" is checked. (Also, for other purposes, make sure the Microphone square is checked, so that later, if you want to record using a microphone plugged into the back of your computer, you can switch over to that. But it's not important right now.)
You should see the "Stereo Mix" or "Wave Out Mix" available, as shown below.

Click "Select" under it. Adjust the balance to the center. Adjust the volume to in the low range.
Click OK, and exit the Properties and Recording Controls.
Now, when you click the red "record" button in Sound Recorder while anything is coming through your speakers, it will be "captured" in wave file format (.WAV).
Note that Sound Recorder defaults to a 60 second recording. To create a "blank" that is longer, do this:
Hit the red record button. Let it record anything for 60 seconds. Click File, then Save, and save the wave file as, say, "Blank1" -- that is, Blank1.wav. Then hit Edit, then Insert File, as shown below:

...then insert this file back into itself, and resave it.
It will now be 2 minutes -- long. Repeat this process, and you'll now have a 4 minute blank wave file. Repeat, and you'll have a 8 minute blank. Repeat again, 16 minutes, etc. There may be a limit on how long of a blank file you can create, depending on how much RAM you have in your computer. Usually, 16 or 32 minutes should be well sufficient.
Where to find free music on the internet.
Once you have your "blank" file, go to a website that offers playing music. Such websites are:
Grooveshark:
www.grooveshark.com On this website, click "Popular", then click "Artist", enter a music artist or group name, then click "Album". There’s a good chance the album you want to hear will pop up. Click the Play button on the same line displaying the album after you click the red record button on your Sound Recorder.After hitting the record button, you click the play button on whatever website you're at, recording on top of a blank template file you’ve created, as explained above. You always click the record button on the Sound Recorder BEFORE you click the play button on the internet website. That way, you won’t miss any of the very beginnings parts of any song.
TropicalGlen:
www.tropicalglen.com/ On this website, there’s Top 20 songs from every year from 1955 to 1989. So, you could go here, click record on your Sound Recorder, then record as much music as you like to.YouTube:
www.youtube.com This has lots of very popular artists with their latest videos. Simply click the Sound Recorder’s record button, and then click the play button on the video, and you will have captured the song (the audio part only) to your computer. If you want to find a specific song, the easiest way is to go to Google.com, then type in what you want. For instance, you could type the following on the Google search line:Youtube Beatles Hey Jude
Youtube 50 Cent Get up
Youtube Johnny Cash Ring of Fire
Creating songs from one long wave file.
I will assume you’ve gone to either Grooveshark, or to the Top 20’s site above, and then you’ve hit record on the Sound Recorder to create a very large wave file with several songs on it. Click File, then click Save. Your file Blank1.wav is ready to divide up into the individual songs. You may also want to click File, Save As, and save it as something temporary, say "Temp1" -- temp1.wav, just in case you mess up.
Here’s how to divide up the one long wave file into separate songs.
Hit the play button on Sound Recorder at the beginning of your recording. When you get to the very beginning of the song -- actually, about a second before the beginning -- click the stop button. Then click Edit, then click "Delete before current position". This trims off the beginning of unwanted sound. Then skip to the end of the first song, and when it ends, click the stop button on your Sound Recorder. Then click Edit, and then click "Delete after current position". Click Save As, then name the song and save it to your hard drive.
Next, return to your original wave file (blank1.wav or temp1.wav) by clicking File, Open, and then re-opening it. Scan to the beginning of the second file, and trim off the unwanted sound before the beginning of this song, and also the unwanted sound after the end of this song, as you did above for the first song. Click Save As, and name the second song. Repeat for song #3, song #4, etc.
You'll now have a collection of a few songs in wave file format. You may wish to return to the internet and record several more songs onto the blank1.wav template, and repeat the above process to have lots of songs in wave file format. Don't worry if your original blank wave file has something else on it; it will be wiped clean when you hit the record button so that you can use it over and over.
Burning your songs to CD, and reformatting them
You can keep your songs in wave file format if you want to. However note that this takes up lots of room on your hard drive. It's best to burn your songs to CD, then "rip" them back to your computer hard drive to a smaller format (wma, mp3). Here's how:
You can try to use Windows Media Player to burn your songs to CD. When Windows Media Player is running, click "Copy to CD or Device". Then click and drag the songs into the "burn" section, and hit "burn" or "copy".
If Windows Media Player will not let you do this, use another software program, perhaps Roxio or Nero.
When done, you'll have a CD of your songs that can be played in any CD player or CD drive on your computer.
Here's how to "rip" the songs back to your hard drive to a smaller format: .WMA, which stands for Windows Media Audio files. These compress down to about 28 MB per a full CD's worth of music, which normally would take up about 650-700 MB. (That’s a compression ratio of about 1 to 25.) Normally, most music CD’s are not 700 MB long. They’re closer to about 600 MB. These compress down to about 24 MB per entier CD.
When you have Windows Media Player open, and your CD in the CD drive, make sure it is in Full Screen mode. Then click Tools, Options, Copy Music. The format I choose is Windows Media Audio. As to the "Audio Quality" -- right below where you select the format -- I set it to "28 MB per CD (64 kps)".
Click "Copy from CD", and depending on your version, click "Copy" or "Rip".
Notice where it puts the songs. Generally, it will record these to your My Documents / My Music folder under a folder that says "Unknown Artist". Browse to this folder, and click on it. Click on one of the songs to listen to it. Verify that this is indeed the music you are working with. Rename it according to the music artist or group and also the CD album title.
Right click on this folder. Click Properties, and note the size of this folder. You should see that is below 30 MB. If so, you’ve done a perfect job. You can now move this folder to wherever you keep your music on your computer, or just leave it where it is. You can also use it to burn other copies of the music to CDs in the future. You can now delete your .WAV file versions of your songs, since you now have them in .WMA format, which takes up far less room on your hard drive.